09.10.2012

Gutsy goes Grain-Free!


Stop putting food before you health.

I know what you are all going to say.  “What!” There is no question that humans just love food! Especially those sugary starchy bready goodies! Am I right?

Take a look at this picture. Would you eat this? Did you even think about the way this donut will make you feel afterwards? You see something good ad just grab it, because it is yummy. The stomach ache, itchy eyes from allergies, joint pain, or headache come and go on a daily basis, but you have classified these symptoms as ones that people just live with…right?


I hate to break it to you, but these symptoms are actually signs that your body is SICK! Grain can be so damaging to the body, in almost every way possible! Most grain products on the shelves in the US are probably GMO and untraditionally prepared. To make things worse, grain products are on the bottom of the USDA food pyramid. This can’t be farther from the truth, out body’s don’t want this!


The correct food pyramid

Take a look at this pyramid (click here). I bet it looks completely different to what you remember it as. Sadly this is not the USDA food pyramid (I will be jumping off the walls when it does! Ha!). For now this is the food pyramid traditional foodies abide by. Fat and meat every day, yes please!

Do you see the grains way up at the tippy top. That is how grain is supposed to be eaten. But why am I telling you to “go-grain free”. This is because the grain crops in the USA are so hybridized, GMO, pesticide-messed-up. Not only that but if you do eat grain, then it has to be carefully and properly soaked and prepared.


Leaky gut

So now you are thinking, well I can just prepare my grains in a proper way and then I can eat my bread. Not so fast! Did you ever take antibiotics? Did you suffer from allergies, sensitivities, muscle aches, get sick more then 1 or 2 times a year, or have a brain disorder (ADHA, anxiety, depression..etc.). These are symptoms of a leaky gut!

A leaky gut is when the big food molecules pass through your gut lining into your blood stream, where they are then marked as foreign invaders. This triggers the body to have an autoimmune reaction. Autoimmune is when your body actually starts to attack itself! The worse off you are, the more likely the chance for you to develop another autoimmune disorder. You can see where this is going…

Do you know what aggravates leaky gut the most and causes it to develop this autoimmune response in the first place? Grain! Grain is one of the most aggravating and hard to digest foods. That is why special care was taken for centuries in cultures to properly prepare grains.


Stop the Grain!

Since you probably have not had GMO-free and properly prepared grains since birth, you are most likely sensitive to them. The only way to stop your body from fighting against you is to STOP GRAIN! There might be other food triggers that cause your body harm, but going grain free if a HUGE start!

[Read more…]

disclosure 3
09.09.2012

Rogan Josh (Succulent, Tender Red Meat Curry)

Hey! I want to introduce you to my new blogger friend Courtney from The Polivka Family.

We have gotten to know each other, now that we are both part of the Real Food Media group. It’s amazing how many similar interests we both have. I think her blog is quite unique and I love its “crunchy” but “spicy” style!   She has created an AMAZING recipe I am sure you all will LOVE!! It’s GAPS friendly too 🙂

.

Every day feels like a new adventure in my kitchen. Even dishes I’ve made before take on new life as I incorporate something new I’ve learned as I spend more time in my kitchen.

Rogan Josh is perfect example of how improving my Indian meals required one simple thing: the secret ingredient of TIME. I’ve made this dish before, but I didn’t marinate it long enough and it just wasn’t as good. This time around, I also used ghee instead of oil, which gave it a richness and depth that oil just can’t even come close to.

Part One

I began this meal in the late morning by thawing a big slab of grass fed beef. You can also use lamb, deer, or bison. I like to make venison curry when my friends start running out of space in their freezers during deer hunting season.

Cut up the meat into 1″ cubes.

Marinate for 4 hours or overnight in the fridge with the following:

  • Six cloves crushed GARLIC
  • 1 tsp CHILI POWDER or CAYENNE (You might want to use half of this. It was medium-hot to me, which is often “hot” to others. Frank is so used to our food being spicy that he didn’t really notice it being warm, but I was trying to pay attention for YOU all! :))
  • 2 tsp PAPRIKA
  • 2 tsp CORIANDER
  • 2 tsp CUMIN
  • 1 tsp GINGER

Sophie really enjoyed the raw grass-fed meat! After feeding her only chicken for a week, she took to the meat like a champ! I’m really glad because since kitten-hood, she’s thought she was vegan and not a carnivore!
Part Two

Heat 5 TBSP GHEE or COCONUT OIL in a deep cast iron skillet or a stainless steel pan, and cook 1 LARGE ONION until lightly browned.

Now comes the dance of frying, the simmering, frying, them simmering to make this meat super tender and succulent. Next, scoot the onions to one side of the pan and FRY FOR 1 MINUTE the following:

  • 1/2 tsp CARDAMOM
  • 5 WHOLE CLOVES
  • 2 CASSIA LEAVES
  • 1 CINNAMON STICK

Wait on the garam masala and the saffron.

Increase the heat to med-high (or medium if you’re using cast iron), then add the meat, mix well and FRY FOR 2 MINUTES.

Stir well, reduce heat to low, cover, and simmer for 15 minutes.

Uncover and FRY FOR ANOTHER 3 MINUTES or until the meat is mostly dry.

Add 1/4 CUP WATER, cover and simmer for 7 minutes or until you can see that the ghee has separated and floated to the surface.

FRY FOR ANOTHER 2 MINUTES, then add 1/2 CUP WATER, cover, and gently simmer for 40-50 minutes until the meat is tender. The liquid should have reduced into a thick sauce.

To finish the sauce, mix the SAFFRON with 2 TBSP of RAW MILK (or coconut milk if you’re on GAPS), and add it to the sauce. Then, stir in 3/4 cup HOMEMADE YOGURT.

Give it a good stir, sprinkle with the garam masala, and once served, let everyone add sea salt to taste.

Serve without rice if you’re on GAPS!

CHECK OUT SOME GREAT INDIAN SIDE DISHES TO GO WITH THIS MEAL.

.

Visit the The Polivka Family blog here .

.

~Stay Gutsy, Caroline

disclosure 3
09.08.2012

Coconut Whipped Cream

Whats fluffy, white, delicate, and lick-the-beater worthy?

Coconut Whipped Cream!!

What is Coconut Whipped Cream?

It’s no secret that I use a lot of coconut on the GAPS diet. You can read about the health benefits of coconut here. (The post is about coconut flakes, but coconut cream is just a form of coconut). I use WFN coconut cream or scoop off the “cream” layer from this brand Natural Value Organic Coconut Milk. All you have to do is chill the cream and whip it up with a pair of beaters. That is simple enough!

*update: the WFN coconut cream is currently out of stock. You can use this one as a substitute. On the plus side, it has NO additives!

Dairy & sugar free

This coconut whipped cream is an alternative to the regular dairy whipped cream. This recipe is suitable for all dairy free people! The best part about this recipe, is that there is no extra sugar added! The coconut milk has a sweetness on its own. Thanks coconut for making life so easy 🙂

Xanthan gum

As many of you probably know, most coconut milk brands contain some gum. Gums of all kinds are not allowed on the GAPS diet. Some people who cannot make homemade coconut milk and are still using the cans are probably getting the xanthan gum as well.

Xanthan gum is usually derived from corn or grain. Though the Xanthan gum at WFN is sourced from Seaweed. This is good news for those with corn or grain allergies!

I am not saying you should “cheat” and eat xanthan gum if you are on GAPS, this would be a bad idea. Obviously regular cream would cause GAPS people a lot of problems, so stay away from milk if you have to as well.

Most of my family is OK with xanthan gum in small amours after being on the GAPS diet for many months. We do not eat it often, but when there is a “treat” that needs whipped cream, this is our go-to-recipe. Once in a while we will whip out the canned coconut milk as well to make dairy free ice-cream.mmm.

If you can eat dairy, then I would suggest regular raw cream to make your homemade whipped cream, so you can avoid the additives. Or even better culture the cream (hmm…maybe a future post recipe!).

Real Food Forager talks a little bit using coconut cream on GAPS (read here). Wrist test (GAPS testing method) the coconut milk first to make sure your body is ok with it. Please do what is right for your body 🙂

 Fluff it up!

Assuming you can have creamed coconut, let us talk about technique. First off, the correct coconut cream is a must! If you cannot find this brand, then I suggest following these steps..

  1. You will need full fat coconut milk like this one: (Natural Value Organic Coconut Milk)
  2. Refrigerate the can and wait for the cream to separate.
  3. Scoop off the white creamy stuff and set aside the clear liquid (no need to dump it, just use it like you would coconut water, smoothies, pancakes, bread..etc)
  4. Use the creamy stuff as you would “coconut cream”

Now shall we get started on the actual recipe?

INGREDIENTS:

1 carton of 100% pure coconut cream  (no additives & no can) or 1 cup “top” cream from canned coconut milk

2 tsp vanilla extract  or pure vanilla beans (learn how to scrape out the seeds here) —optional

DIRECTIONS:

1. Chill in the fridge for about 8 hours or overnight.

2. Scoop out the thick cream (pour out any extra water, if you are using a can- save for later!)

3. Beat with hand beaters on high for about 5 minutes or until thickened and fluffy.

4. Add in the vanilla extract or beans (optional) and beat until combined.

5. Transfer back to fridge for 5 minutes (helps the “whipped cream” stiffen more)

6. Serve like you would traditional whipped cream: on top of berries, pie, or ice-cream sundays (GAPS legal of course!)

7. Yum!

DSCN2967

DSCN2969

DSCN2973

DSCN2978

~Stay Gutsy, Caroline

disclosure 3
09.07.2012

Goodbye Eczema!

        Eczema.

The intense itch. The burning red bumps. The oozing sting.

.

Yep, I have been there too.

Eczema is more than just a nuisance


I have had eczema my whole life. I get it. I admit, I itch it and it hurts worse. But what else is there to do?!  There actually might be a solution. But lets learn what eczema really means.


Eczema is your body’s way of saying “help me!” Skin is an easy way for our body to communicate with us. Most often doctors prescribe creams and medications that really should be labeled as “toxic” . These artificial ingredients are harmful to your body. It makes it even worse that by using these “standard procedure” creams you are pushing the eczema back inside of you. Yuck!


I’m tired of doctors saying “that’s just the way we treat it”. Uhhh! I have heard that one, way too many times. Honestly, the eczema will never go away unless you heal the root cause. Covering up your symptoms only leads you down the road to bigger problems.


My Eczema Story


I suffered from severe eczema growing up. I still get some form time to time when I get extra stressed or sick. But it used to be much worse! My skin would constantly break out in oozy and itchy eczema. I was simply miserable and embarrassed! Not only does eczema hurt, but also having a bright red rash is not very flattering.


My eczema came out at the worst time, between 13-17 years old (I was in middle school and high school). It was humiliating to look in the mirror and see a red rash spread around my eyes, inside my nose, in the cracks of my mouth, and blotched around my chin. I remember crying because I did not understand why my body was doing this to me! My skin was literally screaming out to me, though I did not know how to help it.  (I would put a picture….but surprise surprise, I hid from the camera a lot when I had bad eczema!)


Lets just fix eczema once and for all


After reading tThe Eczema Cure, I wanted to quickly stop and rewind time and hand my young self this book! It was so relieved to find out what exactly to do to get healthy skin again. This book has all the easy answers I needed to cure my eczema! It goes into detail about fixing the root cause. The cure is more simple then you would expect too. Did I mention food?


The #1 I did for my eczema.


I switched the food I eat! Just like The Eczema Cure suggests I did an elimination diet. I certainly could have used the guidelines and help of this books, because I was pretty much blind during the whole process. It took me years of trial and error, frustration, days of research, and pain to learn bits and pieces. The Eczema cure really covers it all. I actually learned loads of new information with every page I  read.


It is a learning, healing and recipe guide for the worst of the worst eczema and skin problems out there!


The Author


Emily from Holistic Kid is the brilliant writer behind this book! I would consider this book “one of a kind” and a must for ANYONE with skin problems! This book has the tools to cure all skin problems! Emily actually healed her daughter’s bad eczema with the principles of this book! Are these pictures amazing or what?


What you will learn from The Eczema Cure?


Here are some things to expect from The Eczema Cure…


  1. What causes eczema.
  2. How to treat eczema.
  3. Eczema triggers.
  4. The elimination diet.
  5. Nourishing recipes. (sooo yummy!)
  6. The healing power of food!
  7. The super helper vitamins.


Buy The Eczema Cure!


If you or anyone you know suffers from skin problems, I would highly recommend this book. Emily is a holistic and Chinese medicine doctor, so she has seen and healed a lot of eczema in her practice. Can you guess how she does it? The Eczema Cure has all her healing answers.


Buy NOW. while it is on sale for $29.95 $24.95 (limited time).

Click here to Buy NOW.!


If you think about it this way, this is a small price you have to pay for all the rough itchy days, worthless medications, and countless hours of research you had to go through. Don’t make my mistake, and make it easy on yourself! I can’t wait to see my own results from The Eczema Cure!


Mexican Carnitas Photo: Mike McCune


~Stay Gutsy, Caroline

disclosure 3
09.07.2012

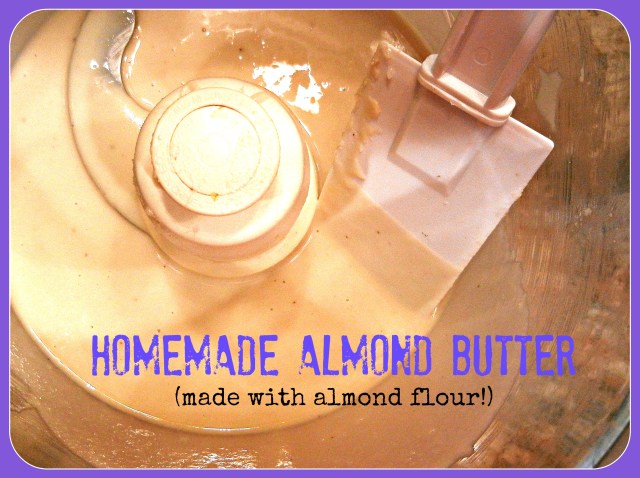
Homemade Almond Butter

I have an easy way to make creamy homemade almond butter! Want to know my trick?

Almond flour!

.

Phytic Acid

Almond flour is already blanched so the skin is taken off. You might think the skin is good and all, but really it contains a lot of phytic acid! Phytic acid inhibits the absorption on vitamins and it lead to cavities and tooth decay! Yikes. Learn more about it here.  You can either soak and dehydrate the almonds or just do what I do..almond flour. (don’t make it hard on yourself!)

.

So Creamy

I think my family likes this almond butter better than the store brand! Since there are no skins, the almond butter is a nice light color, which makes for lighter cored baked goods. This homemade alone butter has a very creamy texture, with a light nutty taste. mmm.

As always this recipe is GAPS friendly!

.

Cost

Bonus! It is cheaper than your jar of almond butter as well. I did not calculate the exact cost but I get almond flour for about $4.75 lb. (Honeyville brand). That’s $1.19 a cup. (one lb of almond flour is about 4 cups) I used 3 cups of flour to make about 2 cups of almond butter. So that is about $3.5 for a little less than 16 oz of homemade almond butter! I do add in 1/4 of this coconut oil (expeller pressed has no taste) to help smooth it out, and one Tbsp of coconut oil is$0.15.

For a total of 16 oz of homemade almond butter, it is $4.09

I think that is pretty good. Plus, there are no skins!

.

Sweet or salty or coconutty

If you like your almond butter slightly sweet, don’t be afraid to add in a squirt of raw honey to taste or even maple syrup if you are not on GAPS. If you like it salty, just add in a pinch of sea salt. If you like the taste slightly coconutty, use centrifuged or cold pressed coconut oil (I use this one).

.

Easy peasy!

I think this recipe is even easier than my Carrot Chips. All you need is almond flour (I like this kind) and a Cuisinart (I use this one) or good blender. Then you just turn on and wait…and wait…and voila it is done! Ok I guess there are a few more technical steps or “tips” that might be helpful. Let me just show you the recipe already!

INGREDIENTS:

3 cups of almond flour (aka almond meal)

4 Tbsp of coconut oil (expeller pressed = no coconut taste) (cold pressed /centrifuged = coconut taste)

DIRECTIONS:

1. Add the 3 cups of almond flour and 4 Tbsp of coconut oil to the Cuisinart or blender.

2. Turn on and blend.

3. About 4 times during the whole process, turn it off. This will allow the machine to cool down and prevent it from overheating. While you are at it, scrape down the sides with a spatula.

4. Blend for about 7 minutes, or until very smooth.

5. Pour into a ball jar.

*store in cabinet for 1-2 weeks. For long-term storage put in refrigerator for several months. (I personally just make it fresh every few months, because the taste is much better!)


~Stay Gutsy, Caroline

disclosure 3