11.13.2012

GAPS Apple Crisp

Soft sweet apples topped with a grain-free cinnamon swirl topping and a hint of maple syrup…I think this is going to be good 🙂


Hello cinnamon-swirled apples!

Its coming to the end of fruit season. All that we have left is a bucket of old apples left over from the apple farm we went to about 2 months ago. Surprisingly, the apples are not moldy or infested with bugs, just a little soft is all. Im going to use them to make GAPS apple crisp again. The first time I made this GAPS apple crisp was the day after we went apple picking. The kitchen smelled so good that day (crisp fall flavors and sweet juicy apples). Here is to another round of apple crisp! Enjoy.

Crumble

For the crumble topping you mean make it fine or coarse. If you want a fine topping, just use almond flour. If you want it more coarse, you are better off grinding your own blanched almonds and leaving them chunkier.


P.S. This apple crisp is amazing with a side of GAPS kefir ice-cream  or coconut whipped cream (dairy free)


INGREDIENTS:

*Note: Maple syrup is not GAPS legal, so use honey

apples:

8-10 small-medium apples

3 Tbsp lemon juice


crumble:

1 1/2 cups almond meal (fine topping) or ground blanched almonds (coarse topping)

1/4 tsp sea salt

2 Tbsp honey or maple syrup

5 Tbsp butter (cold) — cut into chunks

1 Tbsp cinnamon


DIRECTIONS:

1. Preheat oven to 300 degrees

2. Wash and slice the apples very thin. (I used this mandolin and didn’t bother to core the apples, I just let the seeds fall out and picked them out afterward–that’s because I wanted the apples round. Next time I am just going to core the apple and then slice to make it easier on myself!)

3. Tightly layer the apples in a baking dish and drizzle lemon juice over them once they are all in.

4. (If using blanched almonds) use a Cuisinart to pulse almonds until it looks like the consistency you want.

5. Pulse together ground almonds or almond flour, salt, cinnamon, maple syrup/honey, and cold butter (you can always mix it by hand too, but then you will have to cut the butter really small).

6. Evenly spread the crumble topping from step 5. onto the layered apples.

7. Bake for 80-90 minutes. I deliberately kept the oven at a low temperature to allow the apples to get soft while the crumble doesn’t get too dark. If your oven gets extra hot, make sure to check the crisp after an hour. 

8. Yum!


~Stay Gutsy, Caroline

disclosure 3
11.10.2012

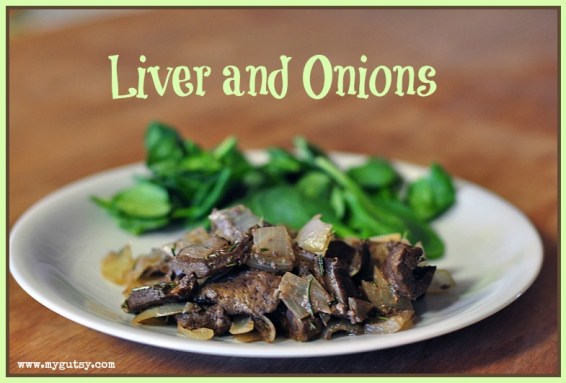
Liver and Onions

Hello all you Gutsy readers!

I am Dina-Marie, the author of Cultured Palate, and I am so excited to be able to share what some may consider a Gutsy recipe – Liver and Onion!

OK, I hear the moans, but before you tune me out, let me just tell you that even my children – all 10 of them – like this recipe!

Yes, you read that right – I have 10 children, 7 of whom are still at home – with one husband and we still love each other! 😉

Why, you might ask, would I feed my children liver and onions?

After living as a vegetarian for 30 years because of of meat “allergies” and suffering with rheumatoid arthritis since my teen years, I was introduced to the GAPS diet. I am so glad Caroline, here at Gutsy has found it at such a young age! Better late than never – right? When I found out about the GAPS diet, I gave a last ditch effort to return to health, quit taking my meds which included steroids (no, I am not advising you to do the same just sharing my experience!) and jumped with both feet into the introduction diet. I figured if it was going to help that I wanted to know beyond a shadow of a doubt that it was the diet!

Pain free!

Amazingly, within 2 weeks my arthritis pain was almost completely gone and by the second stage, I was eating meat! I discovered that I am a real carnivore at heart and I now have 30 years of non-meat eating to make up for! The physical improvements have continued to the point that now, after a year on GAPS, I have no symptoms of rheumatoid arthritis, I am successfully reversing my osteoporosis and my hair is even growing again – I am a new woman!

Real food transition

So, after putting the whole family on the GAPS diet, I have transitioned them to a traditional diet which includes liver. I am passionate about helping Caroline and others like her spread the word about the role REAL food plays in healing. In fact, that is why I started Cultured Palate – to help encourage others in the GAPS diet, traditional food preparation and a real food diet. Be sure to stop by and visit me!

And now, for the recipe:

Liver and Onions Recipe:

INGREDIENTS

1 lb beef liver cut into pieces

1 Tbsp rosemary

1 onion chopped

1 Tbsp thyme

1/2 c red wine (opt.) or use water

1 Tbsp lemon juice

3 cloves garlic minced

4 Tbsp butter at room temp.

1/2 tsp mustard (here is a good GAPS friendly recipe)

salt and pepper to taste

DIRECTIONS:

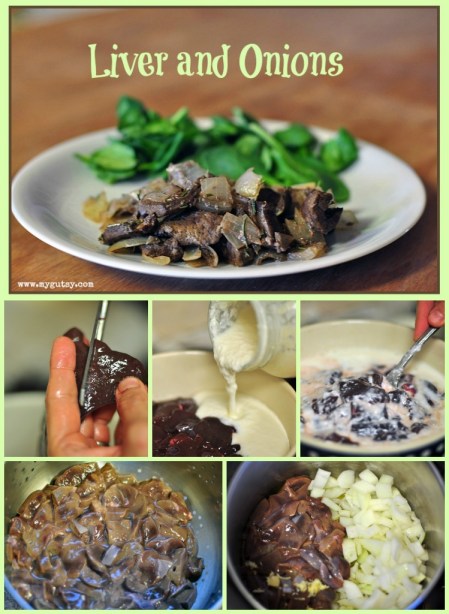
Soak the liver (in the refrigerator) in buttermilk or kefir to reduce the bitter flavor. You may also cover the liver in water and add 4 Tbsp of lemon juice. After 24 hrs, drain, rinse and pat dry.

Saute the liver, onions and garlic in 4 Tbsp butter until the liver is browned and the onions are translucent.

Add the wine (or water), mustard, herbs and lemon juice. Cook uncovered until most of the liquid is gone.

It is just that easy and very delicious!


~Stay Gutsy, Caroline

disclosure 3
11.09.2012

GAPS intro quick guide

Hey! I have a special post from Jennifer from 20 something allergies. Isn’t this chart really cute and helpful! 


About Jennifer: Jennifer Nervo is a blogger, homeschooling mama, research fanatic, and has been fondly dubbed ‘the witch doctor’ by her hubby though she prefers the title voodoo practitioner. It sounds so much more professional. On a typical day, you can find her brewing up potions, lotions, and concoctions while learning to practice sustainability with her 4 year old daughter and very tolerant husband. She loves the ancient practices that comes with traditional foods and medicines but is also very fond of her modern conveniences.

Jennifer blogs over at 20 something allergies and counting…down about a range of topics mainly focused on healing food allergies and other chronic illnesses, eating an allergen- and grain-free diet, and teaching about rotation diets for optimal healing. Find out the varied life topics that make their way onto the blog here.


~Stay Gutsy, Caroline

disclosure 3
11.06.2012

Real Food Made Quick

There is nothing more frustrating then being stuck in the kitchen all..day..long. You know you have had those days if “real food” is part of your daily vocabulary! Let me introduce you to Melissa from RealFoodEater.com. She has some awesome tips!


As much as I love feeding my family Real Food, a big challenge of eating Real Food is figuring out how to NOT be in the kitchen all day preparing it. I get asked lots of questions about Real Food and the top two are probably 1) Where to do start? and 2) How can I make it quicker?

Honestly, I think Real Food often takes longer to prepare. Not because it’s harder to make, but because if you are choosing to eat unprocessed, whole, nourishing foods, you are going to have to make them yourself. No more ripping open a cardboard box, heating up part of it, mixing in the other part and calling it dinner. Instead, you will be baking it slow in the oven or crockpot, peeling, dicing, sauteing, roasting, drizzling, mixing and seasoning. And you know what? It’s going to taste SO MUCH BETTER. I can almost guarantee that it’s also going to be more enjoyable to eat, too. Why? Because things that take time cause us to appreciate them more, savoring every bite.

I LOVE this quote from Joel Salatin in his book “Folks, This Ain’t Normal” as he talks about store-bought, processed food versus Real Food:

“Processing in modern America seems devoted to making food life-less. Taking out nutrients and then adding synthetics creates what is euphemistically called shelf life. Not much life about it, More like embalming a cadaver and calling it body extension. If we’re going to stay true to digestive bacteria, we need to eat things that will perish. In order to perish, they need to be living. If they aren’t living, they can’t perish. If they can’t perish, they can’t give life. Contrary to most popular thinking, perishability is really a good thing, not a bad thing. The next time you buy any food, just put it out on the kitchen counter for a couple of days. If it doesn’t significantly change in appearance, taste, odor, or texture, you just wasted your money on dead stuff. Except for when it’s dehydrated, living food at ambient temperature has a relatively short existence. Living food is normal food.”

And folks, living food takes time to prepare!

But don’t despair, there ARE a few things you can do to help make things not quite so time-consuming. Here are a few that I incorporate on a daily basis that help me survive and still make it possible to feed my family of 6 healthful, Real Food meals:

1. Meal Planning.

This is the single most important thing you can do to save time. If you aren’t willing to do this or flat out refuse, you might as well stop reading this now. It just WILL NOT work without meal planning. Not only will you be scrambling around trying to figure out dinner each night, but I bet you a $100 that you will spend at least that much more on your groceries because of it. Read more about how I plan my meals at 30 Days of Dinners.

Seriously, it is so much easier to take an hour once a month to plan out your dinners for the next 30 days than to fret, stress and try to make stuff up as you go. You will just get frustrated and will end up compromising. Been there. Done that. Just take my word for it!

2. A Buying Club.

Find one and join one. This is how I got started in my Real Food journey. I hooked up with a local buying club and it took the guesswork out of where to shop and what to shop for. Plus, it saves time since you’ll be getting MOST of your groceries and food staples in one place. No more running around to different stores and trying to figure out the best prices on Real Food. Read more about why you’d want to Join a Buying Club.

3. Make Double and Freeze Half.

For example, if you are already making a big 9×13 pan of something (or a big pot of soup), its JUST as easy to make a double batch and freeze half of it for another meal! Then, on those busy nights you have something easy to throw in the oven or on the stovetop for lunch/dinner.

4. Buy (and cook) Whole Chickens.

I love the frugality of cooking up a whole chicken. Not only do you get the initial meal of a juicy, healthful (hopefully organic and pastured!) roast chicken, but you can turn the bones into chicken stock to use for future meals and use the leftover chicken in soups or casseroles later in the week.

5. Prep as Much as You Can at Once.

If you are already chopping up carrots, onions and other veggies for a meal, why not just chop up the rest of what you’ll need for other meals that week? Store them in airtight containers in the fridge, cutting down your prep time for other meals. This is another reason why meal planning can come in handy – you’ll already know how much chopping you’ll need to do!

6. Give Yourself a Little Grace.

Unless you have the unlikely benefit of being able to stay home ALL the time and not having anything else to do (and no little people to try to keep alive), it is very difficult to eat Real Food 100% of the time. It can be done, but for most of us it is just not realistic. Give yourself a little grace. If you have to buy tortillas (gasp!) instead of making your own once in a while, so be it. No one is going to die over it and quite frankly, it’s not worth stressing about. That’s why we follow The 80/20 Rule of Healthy Eating at our house!

7. Have a Few, Quick Favorites…

to incorporate into your meals. Don’t be fooled that Real Food = complicated. It can be easy to change up some of your family favorites into healthier, real food options. One of our favorites is the Beef & Bean Casserole. And homemade soups are always a good quick option, too. Just substitute whole, real ingredients for those fake ones! The best part will be the satisfaction that you will have from knowing you are feeding yourself and your family Real Food.


How about you? What are your favorite quick, Real Food Recipes?


Melissa blogs over at RealFoodEater.com. She lives in West Michigan with her pastor-husband and 4 kids. She works as an RN one day a week, plays piano, loves cooking (and eating!), runs her local buying club and is on the board of her their local chapter of the Weston A. Price Foundation.


~Stay Gutsy, Caroline

disclosure 3
10.31.2012

Do you have the Guts to do GAPS?

Are you new to the GAPS diet? Here is a really good post about….

What is the GAPS diet?

Should YOU do the GAPS diet?

GAPS resources?

Read about it here! Click here!

~Stay Gutsy, Caroline

disclosure 3